Learn how to Restore Website Backup Files into Public html Directory
Restoring a website backup file completely to the public html directory is a critical step in ensuring that your website is safe and secure in case of any unexpected issues. It is essential to have a reliable backup of all your website files. So that in case of any emergency, you can quickly recover your site.
The process involves downloading the backup file, unzipping it, and then uploading it to your web hosting account's public html directory. This process can be done manually or with the help of automated tools like cPanel or Plesk.
This article will discuss the best methods for restoring a website backup file completely to the public html directory. We will also look at some use cases and provide tips on how to properly restore your backup files. With this guide, you will learn how to restore a website backup file completely to the public html directory so that your site can be up and running again in no time.
Public_html files are the location where your website contents are kept and visible to the whole world.
Steps to Restore Website Backup File completely to the public_html Directory
One of the most important step in making sure a website remains operational is to restore website backup files into the public HTML directory.
There are several ways to restore website backup files such as manual and Automated methods. Manual and automated methods are available for restoring website backup files. We'll show you how to restore a website backup file into the public HTML directory using cPanel, it is one of the most popular web hosting control panels.
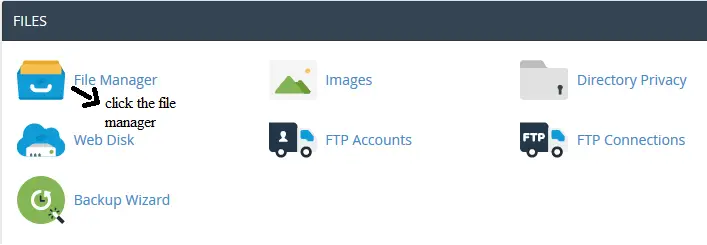
Step 1 - Click on the file manager in Cpanel
First downloading the backup file from your previous host or backup location is the first step in restoring your website. Now Restore the website backup to public_html files that have been taken a backup before from the Cpanel-> file manager-> public_html, you need to restore the zip backup file to the top root directory (public_html) and extract the zip file.
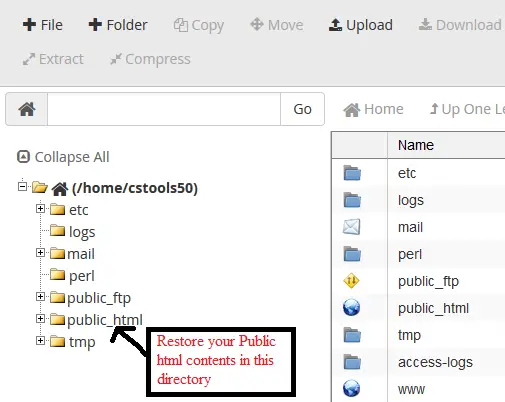
Step 2 - Click on the public_html Directory to Restore Contents
After getting the backup file, it is time to upload it to the server. Simply log into your cPanel account and select the "File Manager" option. Navigate to the public HTML directory in the File Manager and click the "Upload" button in the top menu. Upload the backup file from your computer to the public HTML directory.
Once the backup file is uploaded to the server, you will need to right-click on it and select "Extract" in order to access it, this process is relatively quick and straightforward. Unzipping the file will enable you to access all its contents and store them in the public HTML directory.
To get your website up & running, it's important to import the Database. Doing so will ensure the proper functioning of your website. Access your cPanel to begin and select the "phpMyAdmin" icon to proceed. Simply select the desired database and go to the 'Import' tab to restore the database in phpMyAdmin. Select the .sql file from the backup, hit the "Go" button and you'll start the import process.
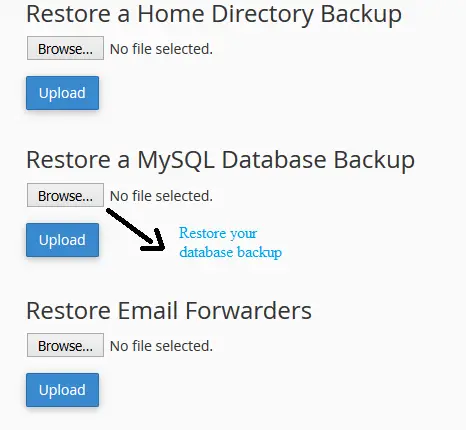
Next, you need to restore database backup file by visiting the backup folder present in the Cpanel dashboard. Once you have restored the database file in the database section, please verify whether it is restored properly or not.
Step 3 - Restore your database file to the backup folder
Whether you're restoring an entire database, restoring it in the respective database section can help you get back up and running faster than ever before. With this method, you can make sure that all of your data is available when needed and that any potential problems are addressed quickly and effectively.
With these tools, you can quickly restore your database file to its original state without any data loss or corruption. It allows you to quickly identify which files need to be restored, as well as quickly locate them in their respective databases. This can save you time and money when it comes to restoring your database file.
Step 4 - Configure the database file to the database username
Set up the website After importing the database, you must configure the website. Validate that the database name, username, and password are the same as those from the recently imported database by opening the "wp-config.php" or "config.php" file in the public HTML directory.

Now Create a username and password for the database restore file (note the username and password because later it is required). At the bottom of the database folder page, select the username that you have created and the database file (to be restored).
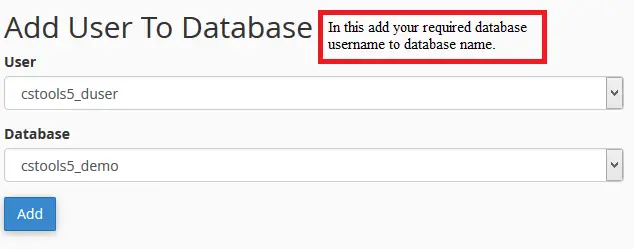
Step 5: Click and add all the privileges to the database file

The main problem of website restoration is, may be due to misconfiguration of the database and contents that cause server errors. If your site is developed using WordPress then check wp-config.php otherwise developed using coding then check config.php
By adding all the privileges to the database file, organizations can control who has access to sensitive data and what actions they can perform on it. To ensure that only authorized personnel can access this data, it is essential to add all the privileges to the database file. This will help protect the data from unauthorized access and ensure its security. So that no confidential information is leaked or misused by malicious actors.
Configure the database files in config.php
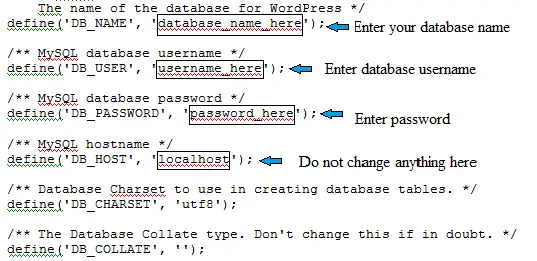
- First edit the wp-config.php or config.php file present in public_html folder
- Enter the database host as "localhost" (default)
- Enter the database name that you have uploaded
- Enter the database username and password the test has been created before.
- Save the file and recheck whether the website restored successfully or not.
Visit the Website Finally, double-check your website to ensure that everything is operational. It is recommended that you contact your web hosting provider for assistance if you encounter any errors.
Conclusion
Finally with cPanel, restoring website backup files into the public HTML directory is a simple process that anyone can do quickly and easily. So quickly restore your website by following the steps outlined above.
Free Seo tools hint: Do you want to check your website hosting provider use website hosting checker tool